Showing posts with label tutorial. Show all posts

Friday, October 28, 2011

Transfer Data from Lite to Full


Thanks for upgrading! You're really going to enjoy the GPS tracking. 

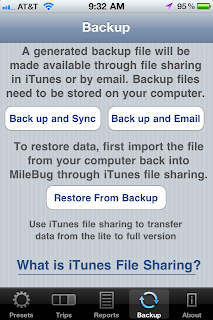
So let's get your data moved over from Lite so you're good to go. The short answer is that there's a tutorial inside MileBug on the Backup tab at the bottom. Just click "What is iTunes File Sharing?", and then click "How to use File Sharing with MileBug". (see screenshots to the right and below)

Here's some detailed steps to help you with this simple process:

FIRST: Backup MileBug Lite Data to Your Computer
1) Open MileBug Lite and select the Backup tab at the bottom
2) Tap the "Back up and Sync" button
3) Connect your iPhone to your computer and move the backup data file to your computer using iTunes File Sharing (see the tutorial inside MileBug mentioned above - screenshot below)

THEN: Load Lite Data file into full version of MileBug
1) Use iTunes File Sharing to put your Lite data backup file into the full version of MileBug
2) Launch MileBug (full) on your iPhone.
3) Select "Restore From Backup"
4) Choose the backup file in the picker from step 1 (probably only one there)
5) Tap "Restore Data"

That's it! Remember, the iTunes File Sharing is how you can always make a backup of your MileBug data. We recommend doing this on a monthly basis, and always doing it before you upgrade either the iOS or MileBug.


^

Tuesday, January 18, 2011

Quick HOW-TO for MileBug Beginners

Here's a repost of a blog entry from last January that I thought might be helpful again:
---------------------

First understand that the general idea is that you open MileBug right when you get in the car to go somewhere. You add a trip, enter the data including the starting odometer reading. Then you close it up and drive to your destination. When you arrive, open MileBug and it will automatically take you to the incomplete trip where you now simply enter the ending odometer reading and hit Save. Voila! Now it's in your Trip List.

For the simplest case, focus only on the Trips tab. Don't worry about the others right now. On the top right, there's a "+" button. Simply tap that to add a new trip. You'll see a new screen slide on with different fields for information about the new trip you're about to take. Simply tap on each one to either choose or enter the data for that field. For fields like Business, Destination, Vehicle, etc. you'll be adding a new one to the system by tapping "Add Preset" at the top of the screen that appears when you select Business or one of the others. Simply add the new one, and it will now appear in your set of Businesses, Vehicles, etc. that you can choose from for this trip and all future trips.

If you want to customize a few things, you can do this in the Presets tab. There you can choose among different settings, as well add/edit/move/delete your set of Businesses, Vehicles, Expense Categories, etc. Keep in mind that each business has it's own set of Destinations and Purposes.