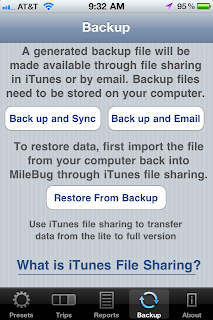
Some people have written in about not being able to open the .mbdata backup file on their computer, so I thought to clarify the difference between Reports and Backups. This pertains to the iPhone version.
Backups
Under the Backup tab in MileBug, you can create a backup file of all your data. It stays on your phone until you email it to yourself or pull it off using iTunes File Sharing. There is a help guide to iTunes File Sharing at the bottom of the Backup tab. Just click "What is iTunes File Sharing?". The .mbdata file generated by the backup process is readable only by MileBug and is intended to be used to restore your data if you have problems with your iPhone or get a new iPhone.
Reports
Under the Reports tab, you can generate a human-readable report in either HTML or CSV (Excel or Numbers) format. You may choose the date range, the business(es), the vehicle(s), and the sort criteria. You can preview the report right in MileBug, too! Then hit Send, and the iPhone Email Composer will appear with your report as an attachment. After entering your email address, hit Send on the email composer and your report will arrive in your Inbox shortly.
Happy Taxes Everyone!
Showing posts with label iTunes File Sharing. Show all posts
Showing posts with label iTunes File Sharing. Show all posts
Tuesday, March 20, 2012
Reports vs. Backups
Labels:
backup,
backup tab,
data backup,
email,
iPhone,
iPhone 4S,
iTunes File Sharing,
mbdata,
report tab,
reports,
restore data
Tuesday, January 17, 2012
How to Remove MileBug Backups from your iPhone
An iPhone MileBug user wrote in asking if there was a way to remove old backup files from his iPhone. There certainly is, and such, I thought there may be others out there wondering the same questions.
WARNING: For either answer, DO NOT DELETE "appData.mbdata"
Short Answer: via iTunes File Sharing.
Step-by-step answer:
WARNING: For either answer, DO NOT DELETE "appData.mbdata"
Short Answer: via iTunes File Sharing.
Step-by-step answer:
1) Connect your iPhone to your computer, open iTunes, select your iPhone listed on the left
2) Choose "Apps" on the top and scroll down to "File Sharing"
3) Select MileBug and you'll see your backup files listed on the right
4) Select the files you wish to delete and hit "Delete" on your keyboard
5) DO NOT DELETE "appData.mbdata" as this is your current working database for MileBug
Don't be afraid to write-in with questions. We would love to help you, and more than likely there are others out there looking for the same answers.
Labels:
backup,
backups,
iPhone,
iTunes File Sharing,
milebug
Friday, October 28, 2011
Transfer Data from Lite to Full
So let's get your data moved over from Lite so you're good to go. The short answer is that there's a tutorial inside MileBug on the Backup tab at the bottom. Just click "What is iTunes File Sharing?", and then click "How to use File Sharing with MileBug". (see screenshots to the right and below)
Here's some detailed steps to help you with this simple process:
FIRST: Backup MileBug Lite Data to Your Computer
1) Open MileBug Lite and select the Backup tab at the bottom
2) Tap the "Back up and Sync" button
3) Connect your iPhone to your computer and move the backup data file to your computer using iTunes File Sharing (see the tutorial inside MileBug mentioned above - screenshot below)
THEN: Load Lite Data file into full version of MileBug
1) Use iTunes File Sharing to put your Lite data backup file into the full version of MileBug
2) Launch MileBug (full) on your iPhone.
3) Select "Restore From Backup"
4) Choose the backup file in the picker from step 1 (probably only one there)
5) Tap "Restore Data"
That's it! Remember, the iTunes File Sharing is how you can always make a backup of your MileBug data. We recommend doing this on a monthly basis, and always doing it before you upgrade either the iOS or MileBug.
^
Labels:
backups,
data backup,
data export,
guide,
help,
how-to,
iTunes,
iTunes File Sharing,
lite vs full,
milebug update,
restore data,
tutorial,
upgrade
Subscribe to:
Posts (Atom)


