Showing posts with label backups. Show all posts

Tuesday, January 17, 2012

How to Remove MileBug Backups from your iPhone

An iPhone MileBug user wrote in asking if there was a way to remove old backup files from his iPhone. There certainly is, and such, I thought there may be others out there wondering the same questions.

WARNING: For either answer, DO NOT DELETE "appData.mbdata"

Short Answer:  via iTunes File Sharing.

Step-by-step answer:

1) Connect your iPhone to your computer, open iTunes, select your iPhone listed on the left
2) Choose "Apps" on the top and scroll down to "File Sharing"
3) Select MileBug and you'll see your backup files listed on the right
4) Select the files you wish to delete and hit "Delete" on your keyboard
5) DO NOT DELETE "appData.mbdata" as this is your current working database for MileBug

Don't be afraid to write-in with questions. We would love to help you, and more than likely there are others out there looking for the same answers.

Friday, October 28, 2011

Transfer Data from Lite to Full


Thanks for upgrading! You're really going to enjoy the GPS tracking. 

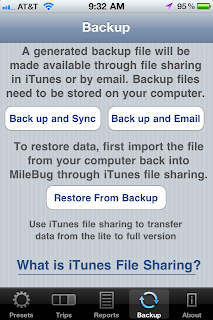
So let's get your data moved over from Lite so you're good to go. The short answer is that there's a tutorial inside MileBug on the Backup tab at the bottom. Just click "What is iTunes File Sharing?", and then click "How to use File Sharing with MileBug". (see screenshots to the right and below)

Here's some detailed steps to help you with this simple process:

FIRST: Backup MileBug Lite Data to Your Computer
1) Open MileBug Lite and select the Backup tab at the bottom
2) Tap the "Back up and Sync" button
3) Connect your iPhone to your computer and move the backup data file to your computer using iTunes File Sharing (see the tutorial inside MileBug mentioned above - screenshot below)

THEN: Load Lite Data file into full version of MileBug
1) Use iTunes File Sharing to put your Lite data backup file into the full version of MileBug
2) Launch MileBug (full) on your iPhone.
3) Select "Restore From Backup"
4) Choose the backup file in the picker from step 1 (probably only one there)
5) Tap "Restore Data"

That's it! Remember, the iTunes File Sharing is how you can always make a backup of your MileBug data. We recommend doing this on a monthly basis, and always doing it before you upgrade either the iOS or MileBug.


^

Tuesday, March 3, 2009

How to Restore MileBug data from iTunes

An alert customer sent this in and another customer has already found it to be successful. I have not verified it myself, so I would appreciate feedback and additional guidance to other readers as you use this approach.

For MAC:
1) Just go to the directory, /Users/[username]/Library/Application Support/MobileSync, and you will see a folder called Backup.
2) Enter Time machine, and replace your backup folder with the most recent one from a time when all was well
3) go to your iPhone in iTunes, right click on it and select restore from backup...

For PC:
1) Save off the backup files as a copy somewhere
2) Connect your iPhone to the computer, but don't sync, cancel it if it starts automatically.
3) go to your iPhone in iTunes, right click on it and select restore from backup...

-- see http://www.maciverse.com/restore-your-old-iphone-backups.html

"for me I only had to re-enter one day of trips... genious. Credit goes to some blogger out there somewhere. It was too late in the evening to take it all in! Hope that you can use that to help any other folk out there."